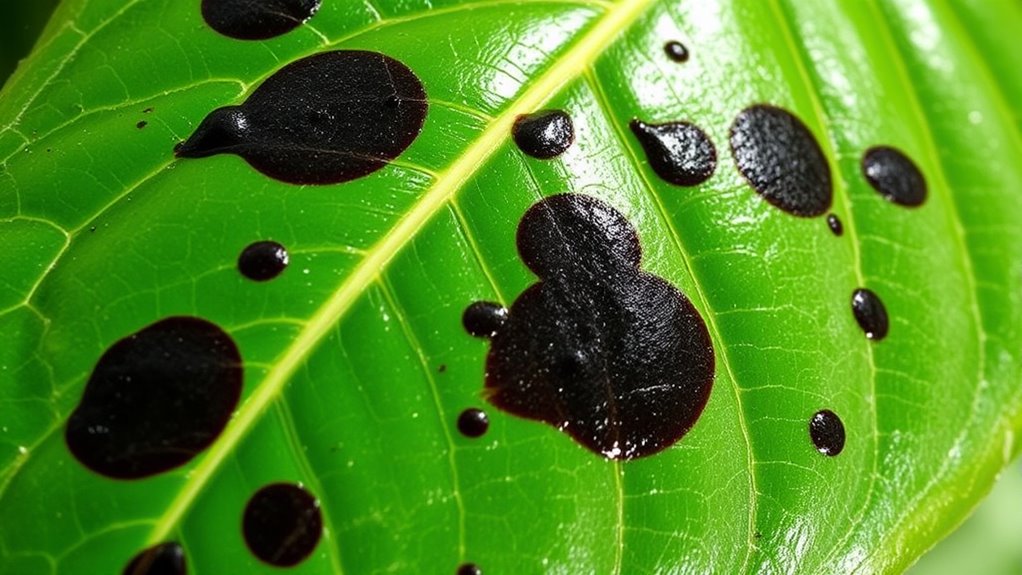
Black spots on your camellia leaves usually come from fungal infections or nutrient deficiencies. Fungal spots are often well-defined, dark, and may have fuzzy mold with scattered patches, while nutritional issues cause uneven yellowing or dull patches without clear borders. Addressing soil health, watering practices, and removing infected leaves helps control problems. To prevent future issues and keep your plant healthy, understanding these signs will guide you in treating and caring for your camellia effectively.
Key Takeaways
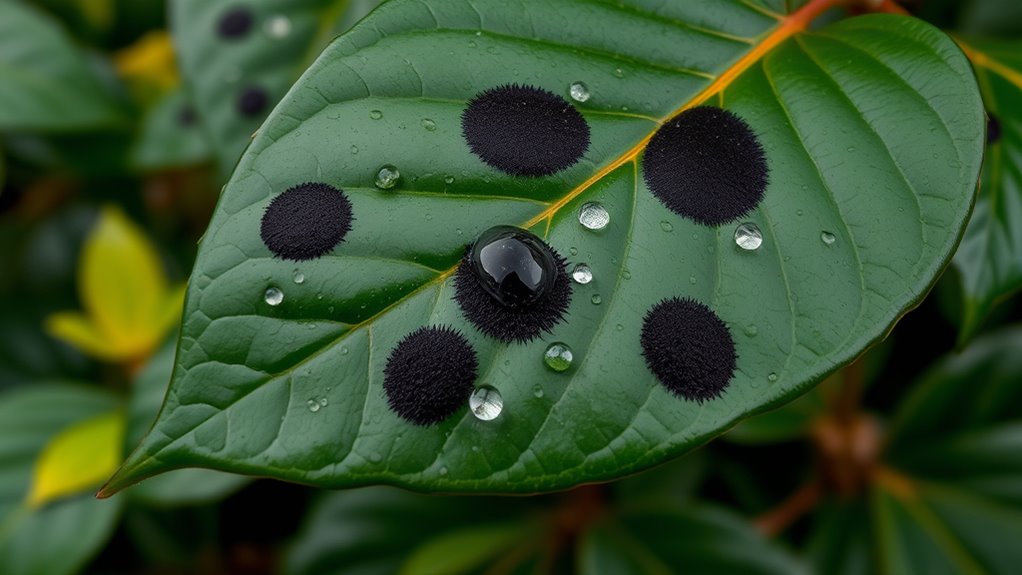
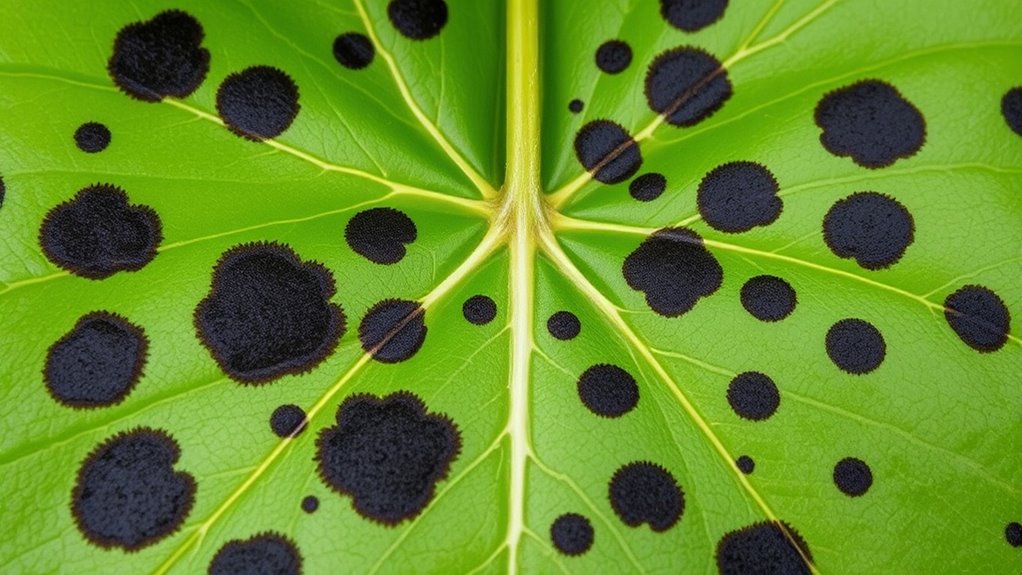
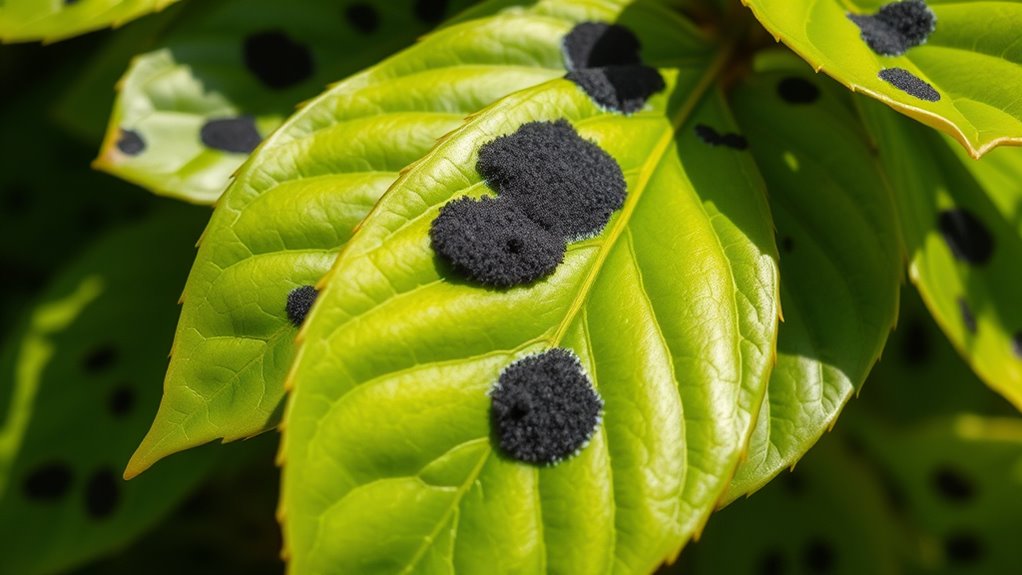
- Fungal spots are usually well-defined, round, dark, and may have fuzzy or moldy textures, often spreading in clusters.
- Nutrient deficiencies cause dull, uneven coloring or yellowing without clear borders or physical holes.
- Fungal issues thrive in humid, wet conditions with poor airflow and overwatering, while deficiencies result from poor nutrition or soil imbalance.
- Removing infected leaves and applying fungicides helps control fungal spots, whereas correcting nutrient deficiencies involves targeted fertilization.
- Consistent monitoring, proper watering, good sanitation, and adequate airflow are essential to prevent both fungal and nutritional black spots.
Common Fungal Diseases Affecting Camellia Leaves

One of the most common issues that affect camellia leaves is fungal disease, which can lead to unsightly black spots and leaf damage. Leaf spot fungi are a primary culprit, causing round or irregular black or brown spots on the foliage. Camellia leaf blight is another serious disease that results in rapid leaf drop and extensive defoliation. You might notice dark, sunken lesions with a fuzzy or moldy appearance, especially during humid or wet conditions. These fungi thrive in poor air circulation and overwatering. To prevent these problems, avoid overhead watering, improve airflow around your plant, and remove infected leaves promptly. Proper sanitation and timely treatment can help keep these fungi at bay and protect your camellia’s health.
Recognizing Signs of Nutrient Deficiencies

Recognizing nutrient deficiencies early can save your camellia from serious health problems. One of the first signs is leaf discoloration, such as yellowing or pale patches, which indicates a lack of essential nutrients like nitrogen or iron. You might also notice uneven coloring or mottled leaves. Unlike pest damage, nutrient deficiencies don’t cause physical holes or speckling but often lead to overall dullness and weak growth. Keep an eye out for stunted or smaller leaves, which can signal deficiencies like magnesium or manganese. Addressing these issues promptly by adjusting your fertilization routine helps restore plant health. Regular monitoring and understanding the subtle signs—like leaf discoloration—are key to maintaining a vibrant, healthy camellia. Additionally, nutrient management techniques can help correct deficiencies and promote robust growth. Incorporating soil testing can further assist in diagnosing specific nutrient imbalances and tailoring your fertilization plan accordingly. Recognizing the symptoms of deficiencies early allows for targeted interventions that can prevent more severe problems later on.
Differences Between Fungal Spots and Nutritional Damage

While nutrient deficiencies often cause subtle changes like dullness or uneven coloring, fungal spots tend to produce more distinct and localized symptoms on camellia leaves. Fungal spots usually appear as round, well-defined patches with a characteristic color, such as black, brown, or yellow halos around the spots. In contrast, nutrient deficiency symptoms often show as general leaf discoloration or uneven coloring without clear borders. Leaf spot patterns from fungi are typically irregular and may spread in clusters, while nutritional damage usually results in uniform discoloration across the affected leaves. Recognizing these differences helps you identify whether fungi or nutritional issues are causing the black spots, allowing for targeted treatment and better plant health management. Understanding the plant’s health condition can help prevent further damage and promote healthier growth, especially when combined with proper plant care practices to support overall vitality. Additionally, observing the distribution and pattern of spots can provide clues about the underlying cause.
Environmental Factors Contributing to Leaf Spots
Environmental conditions play an important role in the development of leaf spots on camellia plants. High leaf moisture creates a perfect environment for fungal spores to thrive, increasing the risk of spots forming. Overwatering or poor drainage can keep leaves damp for longer periods, encouraging infection. Sun exposure also matters; too much direct sunlight can stress the plant, weakening its defenses, while too little can promote excess moisture retention. Shade can trap humidity, making leaves more susceptible to fungal growth. Ensuring proper watering practices and providing balanced sun exposure helps reduce leaf moisture buildup and minimizes environmental stress. Keeping the area around your camellia well-ventilated and avoiding overly damp conditions can considerably decrease the chances of developing black spots. Additionally, understanding lifestyle factors such as watering habits and environmental management can further help prevent issues. Proper air circulation around the plant is also essential, as stagnant air can contribute to fungal development. Implementing cultural practices like mulching can help regulate soil moisture and reduce surface wetness, further lowering fungal risks.
Effective Treatments for Fungal Infections
To effectively combat fungal infections that cause black spots on camellia leaves, you should start with targeted treatments that eliminate the spores and prevent further spread. Use a fungicide formulated for camellias or general garden fungi, applying it according to the label instructions. Regularly remove and dispose of infected leaves to reduce fungal spores in your garden. Maintaining good garden hygiene is essential—clean up fallen debris and avoid overcrowding plants to improve air circulation. Consider applying a copper-based fungicide as a preventive measure if you’ve seen recurring issues. Consistent treatments combined with proper hygiene will help control the fungus and protect your camellias from future infections, keeping your plants healthy and vibrant.
Improving Soil Nutrition for Camellia Health
Healthy camellias thrive when their soil provides balanced nutrients. To improve soil nutrition, consider adding soil amendments like organic compost or peat moss to enhance fertility and drainage. Proper fertilizer application also plays a crucial role; use a balanced, slow-release fertilizer formulated for acid-loving plants to supply essential nutrients consistently. Additionally, incorporating nutrient-rich foods into the soil can help support overall plant health. Regularly adjusting soil pH ensures nutrients remain available for optimal absorption. Here are three key tips:
- Test your soil regularly to identify nutrient deficiencies.
- Incorporate organic matter to boost soil health and microbial activity.
- Follow recommended fertilizer schedules to prevent over- or under-fertilization.
Preventative Care to Protect Your Camellia

Regularly monitoring your camellia and taking proactive steps can prevent common problems like black spots on the leaves. Implement proper pruning techniques to remove diseased or damaged branches early, promoting healthy growth and airflow. This reduces humidity around the plant, lowering the risk of fungal infections. Adjust your watering schedule to avoid overwatering, which can create a damp environment conducive to fungal development. Water deeply but infrequently, ensuring the soil dries slightly between watering sessions. Mulching around the base also helps retain moisture and regulate soil temperature. Using a self watering plant pot can help maintain consistent soil moisture levels, further reducing stress on the plant. Consistent care, combined with timely pruning and a balanced watering routine, keeps your camellia healthy and resilient, minimizing the chances of black spots caused by fungal or nutrient issues.
Frequently Asked Questions
Can Overwatering Cause Black Spots on Camellia Leaves?
Yes, overwatering can cause black spots on camellia leaves. When you water too much, it creates watering stress, leading to root damage that hampers nutrient absorption. This can result in nutrient deficiency, which often manifests as black spots or uneven leaf coloration. To prevent this, guarantee proper watering practices, allowing the soil to dry slightly between waterings, and check for signs of root rot to keep your camellia healthy.
Are Black Spots Always Indicative of Fungal Infection?
Think of leaf spot diagnosis like detective work—black spots don’t always scream fungal infection. Sometimes, they’re a sign of nutrient deficiencies or environmental stress. While fungal causes are common, not every black spot is a villain; some are innocent signs of aging or overwatering. So, don’t jump to conclusions. Carefully examine your camellia, considering both fungal vs nutrient factors before treating. Accurate diagnosis guarantees you select the right remedy.
How Long Does It Take for Treatments to Show Results?
You wonder how long it takes for treatments to show results. Generally, you should start seeing treatment effectiveness within a week or two, depending on the issue. For fungal problems, symptoms like black spots often fade as the infection clears up. Nutrient deficiencies may take a bit longer, around three to four weeks, for visible symptom resolution. Consistent application and proper care are key to achieving the best results.
Do Specific Camellia Varieties Resist Leaf Spot Diseases Better?
Think of camellia varieties like different shields against disease. Some cultivars, thanks to their variety resistance, stand stronger against leaf spot diseases. You’ll notice cultivar differences; certain types naturally resist black spots better, while others may be more prone. Choosing resistant varieties helps keep your camellias healthier longer, reducing treatment needs and keeping your garden vibrant. So, select cultivars known for their resistance to give your plants a better fighting chance.
Can Organic Remedies Effectively Manage Fungal Spots on Camellias?
You can effectively manage fungal spots on camellias with organic solutions and natural remedies. Applying neem oil, copper fungicides, or baking soda sprays helps control fungi without harsh chemicals. Regularly remove affected leaves and improve air circulation around your plants. These organic solutions boost plant health and prevent future infections, making them a safe, eco-friendly way to keep your camellias healthy and vibrant without resorting to synthetic chemicals.
Conclusion
Think of your camellia as a delicate painting—you need to care for every brushstroke. When you notice black spots, it’s like spotting smudges on that artwork; addressing the cause quickly keeps your plant vibrant and healthy. Just like a skilled artist, your attention to fungal issues or nutrient gaps preserves its beauty. Stay vigilant, nurture with knowledge, and your camellia will flourish like a masterpiece that stands the test of time.