
TL;DR
Moving your rig into a closet or booth can drastically reduce noise and echo, but only if you balance sound absorption with proper ventilation. Focus on placement and DIY treatments first, then consider sealing gaps and airflow to keep your setup cool and quiet.
Ever notice how a closet can turn into a surprisingly good recording space? It’s a game changer—if you handle the noise and echo right. But the secret isn’t just adding foam; it’s about where you put it, how you place your gear, and making sure your rig’s heat doesn’t turn your closet into a sauna.
This guide peels back the curtain on the most effective ways to turn a tiny, echo-y closet into a quiet, clear-sounding workspace. You’ll learn the real trick to dampening noise, the best placement for your mic, and how to keep your gear cool without turning your closet into a heat trap.
Acoustic dampening
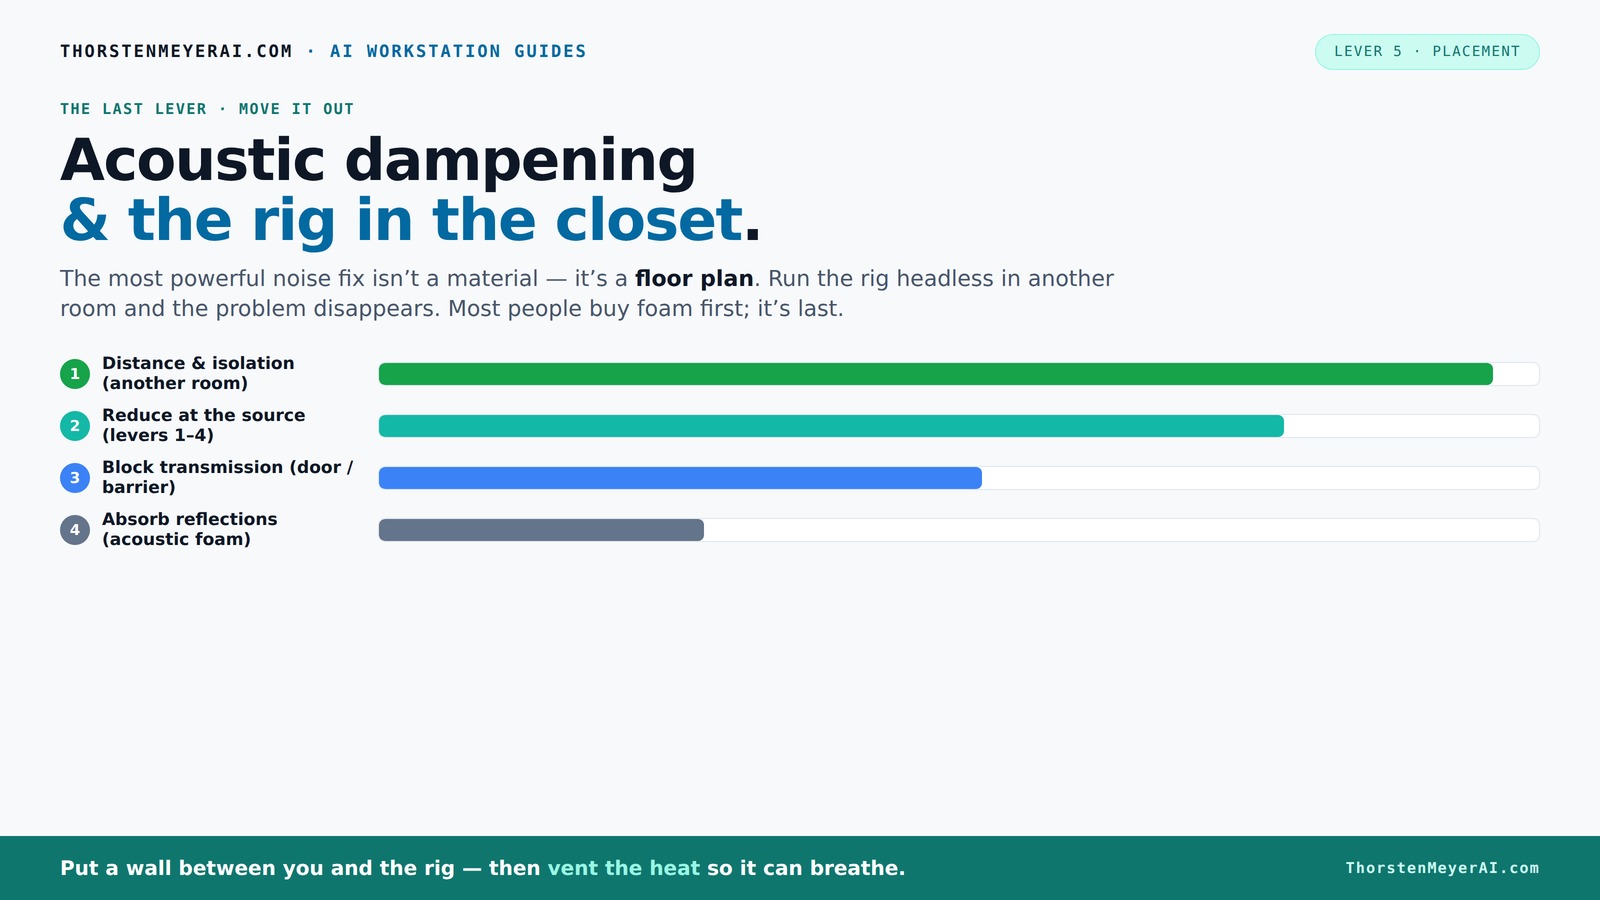
& the rig in the closet.
The most powerful noise fix isn’t a material — it’s a floor plan. A rig you can’t hear because it’s in another room beats any amount of foam. Tap the approaches in Part 1 to see what actually works.
(another room)
(levers 1–4)
(door / barrier)
(acoustic foam)
Contain the noise, not the heat
Key Takeaways
- Prioritize distance and isolation over absorption; a rig in another room beats foam on your desk every time.
- Place acoustic panels at reflection points—behind the mic and on the ceiling—for the cleanest sound.
- Use bass traps and soft materials in the closet corners to tame low-end boom and prevent a hollow sound.
- DIY solutions like blankets, rugs, and foam are surprisingly effective—layer and seal for best results.
- Ventilation is critical: airflow keeps your gear cool, prevents heat buildup, and avoids throttle-induced noise.

'Snap Studio' The Original Vocal Booth, Pro Sound Blankets, Portable Studio-Grade Recording, Sound Isolation, Trusted Globally By Professional Artists, Musicians, VO, Podcasters
#1 Recommended Portable Recording Booth — Featured by Rolling Stone Magazine as the “best sound booth”, Snap Studio’s...
As an affiliate, we earn on qualifying purchases.
As an affiliate, we earn on qualifying purchases.
Why Acoustic Dampening isn’t the Same as Soundproofing (And Why It Matters)
Acoustic dampening and soundproofing are often confused, but they serve very different purposes. Dampening reduces echo and reflections inside a space, making your recordings clearer and less 'boxy.' Soundproofing stops sound from leaking in or out—think of it as building a fortress around your closet.
For most closet studios, dampening is your first step. It’s about softening the sound waves bouncing inside, not blocking noise from outside. Blocking requires sealing gaps with weatherstripping or adding mass to walls—more like fortifying a castle.
Imagine a voice in a bathroom—echoes bounce around, but you can’t hear the neighbors. Dampening inside the bathroom makes your voice sound better; sealing the door stops the neighbor’s lawnmower from sneaking in.
Understanding this distinction is crucial because it influences your approach. Dampening materials are typically easier and cheaper to implement and can dramatically improve the clarity of your recordings even in a small, echo-prone space. However, if external noise is a problem, then soundproofing becomes necessary, but it often involves more extensive modifications and higher costs, so prioritize dampening first to improve your sound quality without overhauling your setup.

Focusound 52 Pack Acoustic Foam Panels 1" x 12" x 12" Sound Proof Foam Panles Soundproofing Noise Cancelling Wedge Panels for Home Office Recoding Studio with 300PCS Double-Side Adhesive
Soundproofing - Acoustic foam panels triangular grooves structure for better noise absorption, helps to reduce and absorb unwanted...
As an affiliate, we earn on qualifying purchases.
As an affiliate, we earn on qualifying purchases.
Where to Place Acoustic Panels for the Best Voice Quality in Your Closet
Placement is everything. The most critical point is the wall behind your mic—this is the first reflection point. If you treat that wall, you cut down on echoes bouncing back into your mic, making your recordings sound tight and professional.
Imagine standing in your closet with your mic at chest level. The wall behind you is where sound reflects most. Cover it with foam or panels—preferably 2-4 inches thick for bass control. Add panels on the ceiling and door to tame reflections from above and behind.
Pro tip: Use a mirror to find reflection points. Sit in your usual recording spot, hold a mirror against the wall, and see where your reflection appears. Those spots are prime for treatment.
Deep understanding of placement ensures you’re targeting the areas that contribute most to unwanted reflections. Properly placed panels absorb sound at the right angles, reducing echo and resonance, which results in clearer, more professional-sounding recordings. Conversely, poorly placed panels may have minimal impact, wasting your effort and money. So take the time to identify reflection points and treat those areas specifically for maximum effect.

Lav Mic Clip, Lavalier Lapel Microphone Replacement Accessories (18 PCS)
Designed for lavalier microphone with 6 mm diameter, suitable for most lavalier microphone
As an affiliate, we earn on qualifying purchases.
As an affiliate, we earn on qualifying purchases.
How to Prevent Your Closet from Sounding Boxy or Hollow
Small closets tend to create a 'boxy' sound—boomy lows and harsh highs—because of parallel surfaces bouncing sound back and forth. To fix this, focus on controlling low frequencies and diffusing sound waves.
Start with bass traps in the corners—these are thick panels that absorb low-end rumble. For example, a small corner bass trap can cut low-frequency buildup by up to 50% in a tiny space, according to acoustic research. The placement of bass traps is critical because low frequencies tend to accumulate in corners due to standing waves, which cause muddiness and boomy sound. Proper placement helps smooth out these issues, making your recordings tighter and more balanced.
Additionally, adding soft materials like rugs, blankets, or foam on walls breaks up standing waves. Think of it as throwing a handful of pebbles in a pond—disrupts the smooth waves, making the sound less hollow. The tradeoff is that overusing soft materials can deaden the sound too much, so balance is key. Use a combination of bass traps and diffusers to achieve a natural, lively sound without excessive echo or hollowness.
Apexicalo Room to Room Air Transfer Fan with Remote, 300 CFM Through Wall Vent Fan with Temperature Control, Hardwired Room to Room Fan for Kitchen, Wood Stove & Laundry (Fits 3.8"-7.4" Walls)
HARDWIRED INSTALLATION & ADJUSTABLE FIT: Designed for seamless wall integration, this hardwired room to room fan requires electrical...
As an affiliate, we earn on qualifying purchases.
As an affiliate, we earn on qualifying purchases.
DIY Tricks to Boost Your Closet’s Sound Quality Without Breaking the Bank
Big soundproofing gear isn’t necessary—your closet can be a star with some simple DIY hacks. Think thick blankets, moving pads, and even rugs. Hang blankets over the door with hooks or tape, and line the walls with foam or even homemade panels from furniture foam.
For example, hanging a thick blanket over the door can cut noise leaks by 20-30 dB, according to user reports. Use command hooks or thumbtacks for easy setup, and layer materials for better absorption.
Don’t forget to seal gaps around outlets and vents with acoustic sealant or weatherstripping. This stops sound from leaking through tiny cracks and makes your setup much more effective. The key is layering and sealing—using multiple materials and sealing all potential leaks enhances overall sound absorption and reduces noise transmission, providing a more controlled environment without expensive investments.
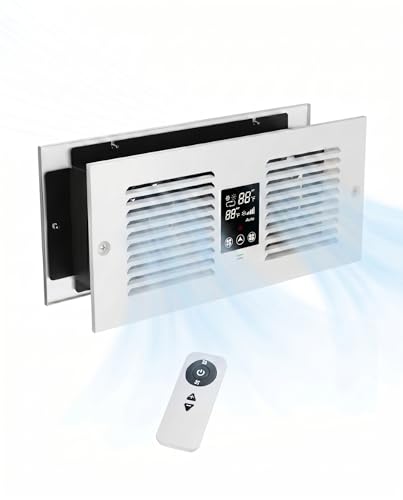
The 'Rig in the Closet' Setup — Ventilation and Heat Are Your Real Challenges
Putting your rig in a closet is a smart move for noise control, but heat is the enemy. A sealed space traps hot air, which can cook your expensive gear. To keep things cool, you need airflow—think vents, fans, or even ducting.
One effective approach is installing a small exhaust fan that pulls hot air out while drawing cooler air in. For example, a quiet 12V fan can keep your closet from turning into an oven, maintaining a steady 70-75°F even during heavy use. Understanding the importance of ventilation is crucial because heat buildup can lead to equipment throttling, increased noise from fans, and potential damage. Proper airflow not only maintains a safe operating temperature but also helps prevent the need for noisy, high-powered cooling solutions that could compromise your soundproofing efforts. The tradeoff involves balancing noise from fans with the need for cooling—selecting low-noise fans and strategic placement minimizes their impact while keeping your gear healthy.
Active ventilation is non-negotiable. Without it, your rig will throttle and fans will scream, defeating the whole purpose. Consider a purpose-built soundproof cabinet with ducted airflow if you want a sleek, quiet, and cool setup. For more on cooling solutions, check out [this article](https://thorstenmeyerai.com/reduce-heat-noise-ai-workstation/).
How to Seal Gaps and Improve Isolation in Your Closet Studio
Sound leaks through gaps—around the door, outlets, and vents—more than you might think. Sealing these tiny openings makes a huge difference in overall noise reduction.
Use weatherstripping around the door frame, and apply acoustic sealant around electrical outlets. For example, sealing a door gap with weatherstripping can reduce sound transmission by 15-20 dB. While sealing is effective, it’s important to recognize that no matter how well you seal, some sound may still escape through structural weaknesses or ventilation openings. Therefore, sealing should be part of a comprehensive approach that includes proper placement, absorption, and possibly some level of soundproofing if external noise remains problematic. Also, consider installing a door sweep to close the gap at the bottom, which is often a significant source of sound leaks. The tradeoff with sealing is that it can make access slightly more cumbersome but greatly enhances your overall noise isolation, especially in small, echo-prone environments.
Frequently Asked Questions
What is the difference between acoustic dampening and soundproofing?
Acoustic dampening reduces echo and reflections within a space, making your recordings clearer. Soundproofing blocks sound from entering or escaping, creating a sealed environment. For a closet studio, focus on dampening first, then add sealing if outside noise leaks in.
Where should I place acoustic panels in my closet?
Place panels at the first reflection points—mainly behind your mic, on the ceiling, and on the door. Use a mirror to find these spots easily. Thick panels (2-4 inches) work best for bass, especially in small spaces.
Do blankets or moving blankets work for soundproofing?
Yes, thick blankets can absorb sound and reduce leaks, especially when layered or hung properly. They won’t fully soundproof your closet but significantly improve sound quality and reduce noise transmission.
Should I install bass traps in my closet booth?
Definitely. Bass traps in the corners help control low-frequency buildup, which is common in small, parallel-walled spaces. They make your recordings tighter and less boomy.
How do I keep my closet cool with a rig inside?
Use active ventilation—quiet exhaust fans or ducted airflow—to remove heat. Make sure your space isn’t sealed airtight, and consider liquid cooling or high-quality AIOs to move heat out efficiently.
Conclusion
Your closet can be a quiet, professional-sounding space if you focus on placement, basic DIY absorption, and proper ventilation. It’s not about expensive gear or perfect materials—smart positioning and sealing do most of the work.
Remember, the goal isn’t just to make noise disappear—it’s to tame reflections, control low end, and keep your gear cool. After all, a well-placed rig in a ventilated, treated closet beats a noisy, overheated setup any day.