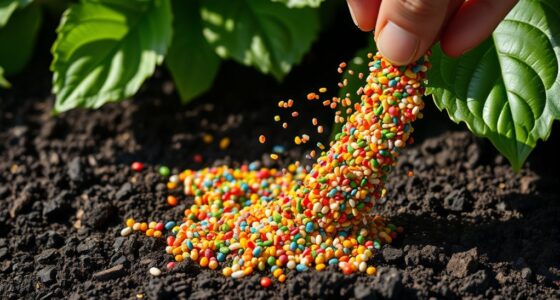
To guarantee your fertilizer spreader applies just the right amount, calibration is key. You should regularly check and adjust your spreader based on the fertilizer type, weather, and terrain. Use accurate tools like a scale and proper containers to test the application rate. Proper calibration prevents waste, saves money, and promotes healthy crops. Want to learn step-by-step techniques and troubleshooting tips? Keep going to master your spreader calibration effectively.
Key Takeaways
- Regular calibration ensures even fertilizer distribution, preventing waste and crop damage.
- Use measuring tools and proper containers to accurately test and adjust spreader settings.
- Conduct calibration at key times: season start, fertilizer change, or if uneven spreading occurs.
- Troubleshoot issues like clogs, drift, or uneven flow to maintain application accuracy.
- Proper maintenance of spreader components preserves calibration precision and enhances efficiency.
Why Accurate Calibration Matters for Your Fertilizer Spreaders

Accurate calibration is vital because it directly affects how evenly and effectively your fertilizer is spread across your fields. The design of your spreaders influences how well they distribute different fertilizer types, making calibration essential. If your spreaders aren’t properly calibrated, you risk applying too much fertilizer in some areas and too little in others, which can hurt crop growth and waste resources. Different fertilizer types, such as granular or liquid, require specific calibration settings to guarantee maximum coverage. Proper calibration ensures your equipment delivers the right amount, reducing waste and preventing over-application that could damage plants or the environment. Additionally, understanding your spreaders’ design and technology helps optimize performance and ensures sustainable farming practices. Being familiar with the spreaders’ features can further improve calibration accuracy and efficiency. Recognizing the impact of calibration on overall farm productivity can help farmers make informed decisions and improve their operational outcomes. Moreover, staying updated on advancements in spreader technology can lead to more precise and efficient fertilizer application.
How Often Should You Calibrate Your Spreaders?

You should calibrate your spreader regularly to maintain accuracy, but how often depends on your usage and equipment. Keep an eye out for signs like inconsistent application or changes in spread patterns, which indicate it’s time to verify again. Staying proactive ensures your results stay precise and effective. Additionally, understanding maintenance routines can help extend the lifespan of your tools and keep your calibration on point. Regular calibration also aligns with best practices for precision agriculture, ensuring optimal fertilizer efficiency and cost savings. Incorporating sound scientific principles into your calibration process can further enhance your accuracy and effectiveness.
Regular Calibration Schedule
Regular calibration is essential to guarantee your spreader applies materials accurately and efficiently. You should calibrate your spreader at the beginning of each season or whenever you change product types. For consistent results, check the spread pattern regularly—especially after adjustments or repairs. The calibration frequency depends on usage; if you spread fertilizer weekly, monthly calibration is advisable. For occasional use, calibrate before each job to ensure accuracy. Keep in mind that environmental factors like wind or uneven terrain can affect application, so recalibration might be necessary during the season. Developing a routine schedule helps maintain proper calibration and ensures your spreader delivers the right amount of material every time, saving you money and avoiding waste. Incorporating proper calibration techniques into your routine can help maximize efficiency and reduce material costs. Additionally, understanding spreader mechanics can assist in troubleshooting and maintaining your equipment for optimal performance. Regular maintenance and awareness of application consistency are key to achieving precise fertilizer application and avoiding costly errors. Being familiar with different fertilizer types and their properties can further improve calibration accuracy and effectiveness. Conducting a calibration test periodically ensures your settings remain accurate over time, especially after cleaning or repairs.
Signs It’s Time
Knowing when to recalibrate your spreader is essential to maintaining accurate application. If your fertilizer isn’t spreading evenly, or if soil health seems compromised, it’s a clear sign. Weather impact, like wind or rain, can throw off your calibration, making adjustments necessary. Keep an eye on these signs:
- You notice inconsistent coverage across your field or lawn.
- The fertilizer seems to be unevenly distributed, affecting soil health.
- Recent weather changes have impacted application accuracy, and you see irregular growth or patchy areas.
Regularly checking your calibration ensures proper fertilizer application and healthier soil. Don’t wait for problems to escalate—staying proactive keeps your lawn lush and your fertilizer effective, regardless of weather impact. Proper calibration techniques are crucial for ensuring your spreader functions accurately over time.
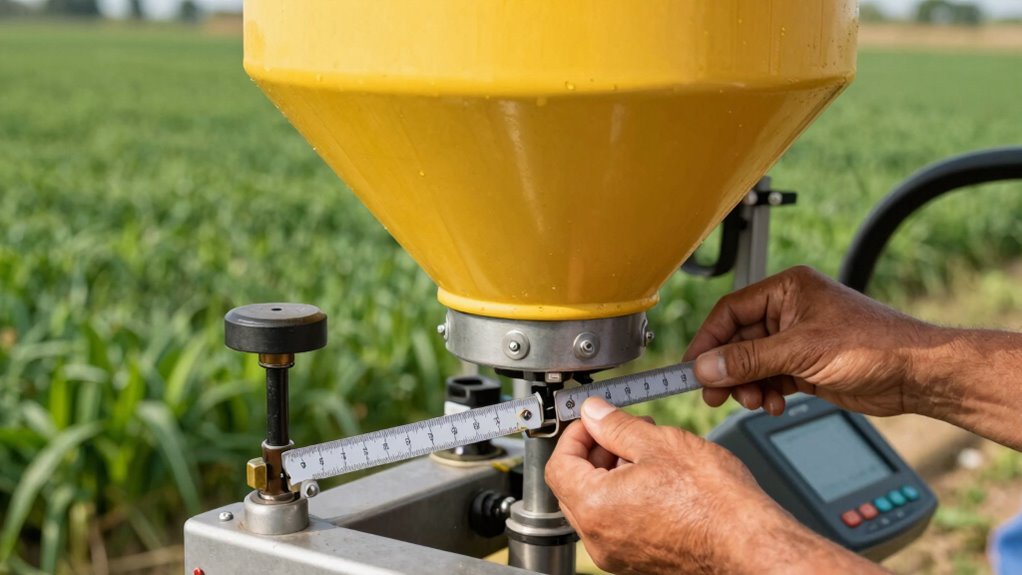
What Supplies Do You Need to Calibrate Your Fertilizer Spreader?

To calibrate your fertilizer spreader accurately, you’ll need some essential measuring tools like a scale or measuring cups. Choosing the right calibration container is important to make certain of precise application, so pick one that suits your spreader and needs. Don’t forget to check that your fertilizer is compatible with your spreader to prevent clogs or uneven distribution. Additionally, understanding spread pattern and adjusting your spreader settings accordingly can greatly improve application accuracy. Being aware of hidden mysteries in common equipment can help you troubleshoot calibration issues more effectively. Also, familiarizing yourself with essential oils for respiratory health can provide insights into maintaining overall equipment cleanliness and air quality during operation.
Necessary Measuring Tools
Calibrating your fertilizer spreader accurately requires gathering the right measuring tools to guarantee precise application. Having the proper supplies ensures you can account for soil testing results and weather considerations that influence fertilizer spread.
Here are the essential tools you’ll need:
- Measuring cup or scale – To accurately measure fertilizer and ensure consistent application rates.
- Calibration tray or board – To observe the spread pattern and adjust settings accordingly.
- Weather app or thermometer – To track weather conditions that may affect fertilizer dispersal and help fine-tune your calibration.
With these tools, you’ll confidently calibrate your spreader, optimize fertilizer use, and promote healthy, thriving crops.
Calibration Containers Selection
Choosing the right calibration containers is vital for accurate fertilizer spreader adjustments. Your container selection depends on your spreader’s design and the fertilizer types you plan to use. For spreaders with small openings, use smaller, graduated containers to measure precise amounts. If your spreader has larger discharge points, larger buckets or measuring jugs work better. Clear, durable containers with volume markings make it easier to record results accurately. It’s important to select containers compatible with the fertilizer’s consistency, whether granular or liquid. Some spreaders may require specific containers to prevent clumping or spillage. Overall, choosing well-suited calibration containers ensures you get precise measurements, helping you fine-tune your spreader for maximum efficiency and cost savings. Additionally, understanding your spreader’s calibration process can help you make more accurate adjustments and improve application accuracy, especially when considering spread pattern and distribution uniformity.
Fertilizer Compatibility Checks
Before you start calibrating your fertilizer spreader, it’s essential to gather the right supplies to guarantee compatibility with your fertilizer type. Proper fertilizer compatibility checks prevent wasted product and ensure effective soil testing for ideal nutrient management. To do this, you’ll need: 1. A representative sample of your fertilizer—so you know exactly what you’re applying. 2. A scale to measure precise quantities, ensuring accurate calibration. 3. Clear instructions or manufacturer guidelines for your spreader model, to verify compatibility and avoid misapplication. Conducting a vetted calibration test that accounts for wave and wind conditions can further improve accuracy during application. Understanding fertilizer types helps you assess whether your fertilizer is suitable for your soil testing results and nutrient management plan. Recognizing application techniques ensures the fertilizer is applied evenly and efficiently, maximizing its benefits. Additionally, reviewing farming practices related to fertilizer application can help optimize your calibration process and promote healthier crops. Using these supplies helps you assess whether your fertilizer is suitable for your soil testing results and nutrient management plan. Confirming compatibility ensures your fertilizer spreads evenly, promotes healthy crop growth, and saves you money in the long run.
How to Calibrate Your Fertilizer Spreader: A Step-by-Step Guide

To guarantee your fertilizer spreader applies the correct amount of material, proper calibration is essential. Start by measuring a known area, like 100 square feet. Fill your spreader with fertilizer and set it to your intended setting. Walk at a steady pace and evenly distribute the fertilizer across the area, ensuring a consistent spread pattern. Collect the leftover fertilizer and weigh it to determine how much was applied. Adjust your spreader setting if the amount differs from your target rate. Repeat this process until your seed distribution matches the desired application rate. This calibration ensures your fertilizer spreader delivers accurate, uniform coverage, preventing over-application or waste, and optimizing your effort for better crop or lawn health. Calibration accuracy is critical to achieving consistent and effective results. Additionally, maintaining your spreader and regularly checking its calibration can help preserve its performance over time.
Troubleshooting Common Calibration Problems

Calibration problems can often stem from simple mistakes or overlooked factors, causing your spreader to apply too much or too little fertilizer. These issues can disrupt your spread pattern and lead to uneven coverage. To troubleshoot, check these common causes:
- Hopper flow issues – Ensure the hopper isn’t clogged or blocked, which can cause inconsistent fertilizer flow and affect calibration.
- Incorrect spread pattern – Verify that the spread pattern matches your settings; a skewed pattern indicates calibration drift.
- Adjustment errors – Revisit calibration steps to confirm that your rate settings are accurate and consistent.
Addressing these points helps restore proper hopper flow, guarantees a uniform spread pattern, and saves you from wasting fertilizer or under-application. Proper troubleshooting keeps your calibration on point.
How to Maintain Your Spreaders to Keep Calibration Accurate

Regular maintenance is essential for keeping your spreader’s calibration accurate and consistent. To do this, regularly inspect and clean your spreader, removing any debris or buildup that could affect fertilizer flow. Check for worn parts, especially the agitator and gears, to ensure smooth operation. Different fertilizer types may require adjusting your spreader settings to maintain accuracy. Use the table below to keep track of maintenance tasks based on fertilizer types and parts to check:
| Fertilizer Types | Maintenance Tasks |
|---|---|
| Dry | Clean, inspect, and calibrate hopper |
| Wet | Rinse thoroughly, check for clogs |
| Slow-release | Lubricate moving parts regularly |
| Granular | Verify flow rate and adjust settings |
Consistent spreader maintenance guarantees precise calibration and ideal fertilizer distribution.
The Benefits of Proper Calibration: Save Fertilizer and Money

Proper calibration guarantees your spreader distributes fertilizer accurately, which directly saves you money. When you calibrate correctly, you ensure every bag of fertilizer is used efficiently, reducing waste and preventing over-application. Soil testing helps determine the right amount of nutrients your soil needs, making calibration even more precise. Weather considerations, like wind and rain, also influence how fertilizer is spread; adjusting your calibration accordingly can prevent runoff and loss.
Here are three benefits you’ll experience:
- Maximize fertilizer use, cutting costs and avoiding unnecessary purchases.
- Improve crop health by applying the right amount at the right time.
- Save time and effort by reducing the need for reapplication or correction.
Proper calibration is your best tool for saving money and optimizing results.
Frequently Asked Questions
Can Calibration Be Done Without Professional Tools?
Yes, you can perform DIY calibration without professional tools. Use basic calibration tools like a scale to measure fertilizer amounts accurately. First, mark a known distance on your spreader’s path, then spread fertilizer over that area. Weigh the fertilizer used to determine your spreader’s output. Adjust the setting accordingly and repeat the process. This simple method helps guarantee your spreader is accurately calibrated without needing specialized equipment.
How Does Weather Affect Fertilizer Calibration Accuracy?
Weather impact can markedly influence fertilizer calibration accuracy. High humidity, rain, and wind create calibration challenges because they affect how fertilizer disperses and settles. When it’s windy, you might under- or over-apply due to uneven distribution. Rain can wash away fertilizer or cause clumping, making calibration less reliable. To maintain accuracy, calibrate your spreader under consistent weather conditions and adjust settings as weather changes.
What Are the Signs of an Improperly Calibrated Spreader?
Imagine uneven patches of green across your lawn—that’s a clear sign your spreader isn’t calibrated right. You notice inconsistent spread rate, with some areas overloaded and others bare. Coverage uniformity suffers, leaving your plants either starved or overwhelmed. If you see clumps of fertilizer or dry spots, it’s time to verify your settings. Proper calibration ensures an even spread, giving your lawn a lush, healthy look without waste.
Is Calibration Necessary for All Types of Fertilizer?
Yes, calibration is necessary for all types of fertilizer because different materials have varied spread rates. You should regularly check your spreader’s calibration, especially before each use or after changing fertilizer types. This guarantees consistent application and prevents waste or under-application. Proper calibration frequency depends on your equipment and fertilizer, but a quick test before each use keeps your spreader functioning accurately and saves you money in the long run.
How Long Does the Calibration Process Typically Take?
Calibration usually takes about 15 to 30 minutes, depending on your spreader and fertilizer type. You should perform this calibration regularly to guarantee a proper spread pattern and accurate application rates. The process involves measuring output, adjusting settings, and testing again. By maintaining a consistent calibration frequency—say, at the start of each season or after making adjustments—you’ll ensure your fertilizer is spread evenly and efficiently.
Conclusion
By calibrating your spreader regularly, you guarantee precision, maximize efficiency, and save money. Keep your equipment accurate, maintain proper settings, and troubleshoot issues quickly. Stay consistent, stay vigilant, and stay informed. Proper calibration isn’t just a task; it’s a habit that pays off in healthier lawns, better yields, and fewer wasted fertilizers. Make calibration part of your routine, and watch your results improve every season.